Sewing instructions for women’s non stretch skirt:
- description of the content of the sewing instructions,
- examples of where to put in zips,
- cutting out the pattern,
- sewing skirt together and putting in zip,
- sewing waistband for skirt with one zip,
- sewing waistband for skirt with two zips.
Sewing waistband – single zip
CUTTING THE WAISTBAND
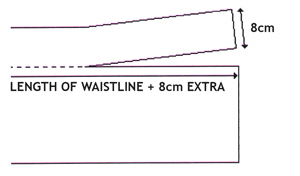
The waistband for this skirt is cut in the same way as for the stretch skirt. Rather than having the joining seam at the back, as for the stretch skirt, the non-stretch skirt‘s waistband meets at the front where the zip is, and overlaps itself so you can have a button hook or even Velcro for the join.
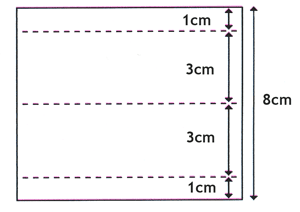
Cut the waistband the length of the waist + 8 cm long (the 8 cm includes 1 cm each end seam allowance + 6 cm overlap) and 8 cm wide (the 8 cm width is for an elastic which is 3 cm wide + 1 cm each end seam allowance).
Fold and press the ends as shown.


If you have chosen to use stretch fabric for the middle panel at the back of skirt you will have to insert stretch material for this part in the waistband too.
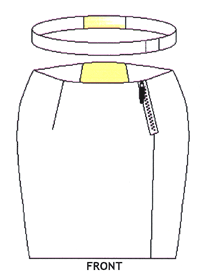
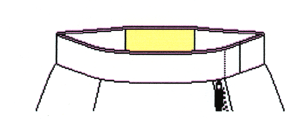
This waistband is cut like the others, except for the piece of stretch fabric inserted into it to match the stretch panel. Measure carefully where to insert it so the waistband will fit both stretch join and have overlap at zip.
SEWING THE WAISTBAND
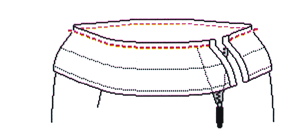 Attach the unfolded side edge to the top of the skirt, right sides of the fabric facing each other.
Check that the overlapping edges are placed so your preferred choice of button, hook or Velcro can be sewn on after the waistband is stitched in place.
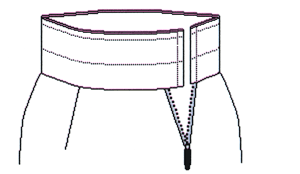 If you have chosen a stretch panel at back make sure the stretch part of the waistband is attached to the stretch part of the skirt. Stitch on.
Fold up the waistband and press seams up towards the waistband.
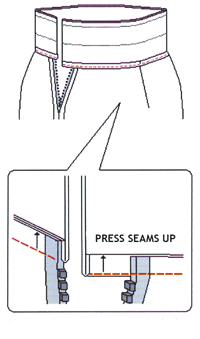
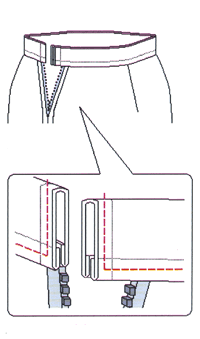 Fold the waistband down on the inside of the skirt. The folded edge is pressed under making the waistband even on front and back sides of skirt. Stitch the edges together and put stitching around the bottom of waistband to secure it and make a flat join.


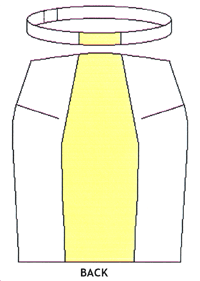
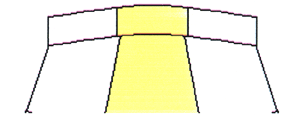


thanks for the illustration!!
Illustrations helped a LOT! Must be a lot of work. Thanks!
Your welcome
Just what I was looking for! I’m making a pencil skirt using one I own as a pattern. I know I’ve done this, but not doing it from a pattern this time I couldn’t remember the steps. Thanks for the great, easy to follow instructions, and illustrations.
Your welcome. We like pencil skirts 🙂
Thank you for taking the time to put this tuitorial together! I just finished my Christmas skirt and it really needs a waist band, thank you thank you thank you!
Thanks so much. You’ve done a great job. Please how do I sew pocket into a four pieces skirt.
Look at an ordinary skirt pattern and use the pockets in the side seams (you should be able to just fit them in the seam of our pattern. You can also use the adaption made for pockets in pants found here
http://en.fashionfreaks.se/patterns/mens-pants/sewing-instructions/adapting-pattern-sewing-pockets/
Pockets is a problem area as the usually pucker out when seated. If you want them anyway I personally would go for the ones in the link above av they are more attached to fixed seams.
Thank you so much for the tutorial. I have an unfinished skirt I made using one of my skirts but don’t know how to insert a waistband,this is of great help. Say,can you show how to make provision for zips and back vents when making patterns for a Straight skirt? Thank you once again for this tutorial.
Hi,
we don’t have an exact instruction for a skirt with zips and vent. At the moment we have received funding for other things so it’s hard to know when we will have time to get back to things like this. However, I am collecting a list of “wishes” for later.
In the meantime you might find the instructions on this side http://en.fashionfreaks.se/patterns/skirts/sewing-instructions-non-stretch-skirt/insert-zips-and-sewing-together/ of use to you for the zips. This is applicable to hidden zips placed on any seam.
The vent is not something we have really approached. The closest you will find is the descriptions of slits in jackets on this page http://en.fashionfreaks.se/adapting-ready-made-clothes/simple-adaptions/jackets-slits-over-hips/ However, you will probably want to sew a slit/vent where the pieces overlap slightly as this will look a bit more fancy – especially for a vent in the back seam.
We’re not the only ones providing sewing instructions though, and when in doubt I always make a search on youtube where you can find a wealth of information. You might find one of these instruction videos helpful.
http://www.youtube.com/watch?v=66aq038eP5Y
or
http://www.youtube.com/watch?v=rLzya7hRUXY
Good luck
Susanne
On the last step, do you sew in the right side of the fabric or the wrong side, or can you do either? When we sew on the back side there are a few spots that miss the other side of the waist band…
Tack snälla för en utförlig och pedagogisk instruktion. Detta kommer hjälpa mig i mitt kollektionsarbete i skolan. TACK!