NOTE: In these instructions we will refer to the button side of the jeans on this sample as the LEFT side and the button hole side as the RIGHT side.
This sample has been done with white fabric and coloured threads so that details can be seen clearly Use whatever fabric you like, but a thinner cotton fabric will be easier to work with than replacing the facing with denim.
Removing zip and facing
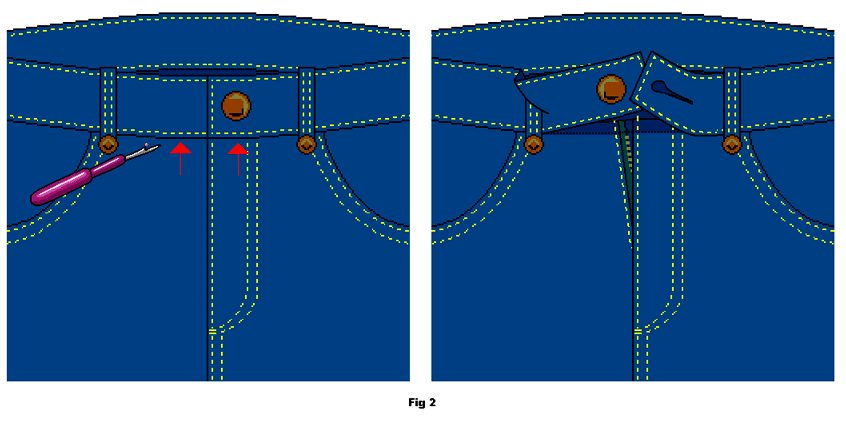
Using an unpicking tool, carefully unpick the stitching on the lower waist band at the fly area both on the front and back side of the pants. You need to expose and have access to the entire zip and facing area (fig 1 and 2). 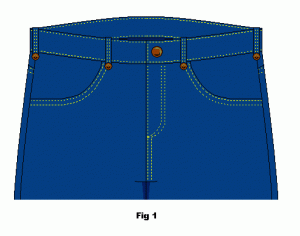
Unpick the RIGHT side (button hole side) facing. Start with the top stitching on the front side (fig 3). 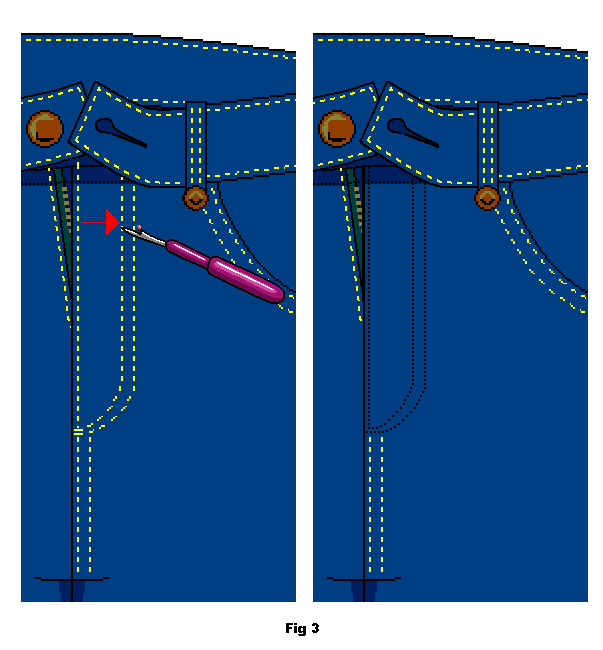
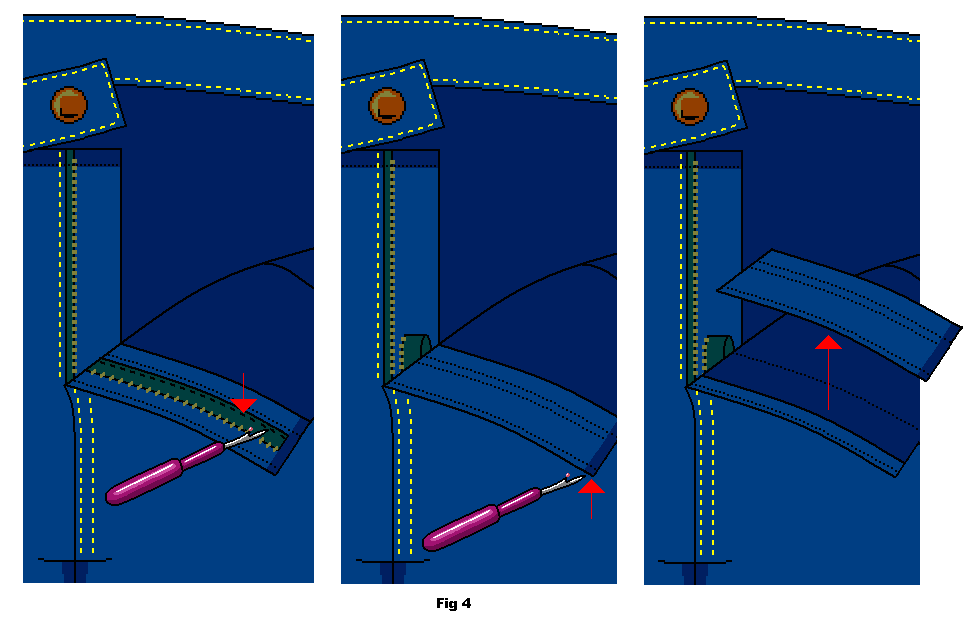
Unpick the stitching on the zip and remove this. Place the zip to the side. Then remove the entire facing and set aside for later use (fig. 4).
Unpick the top stitching on the front LEFT side (button side). Then unpick the zip stitching and whatever other stitching that is holding the facing in place (fig. 5 and 6). 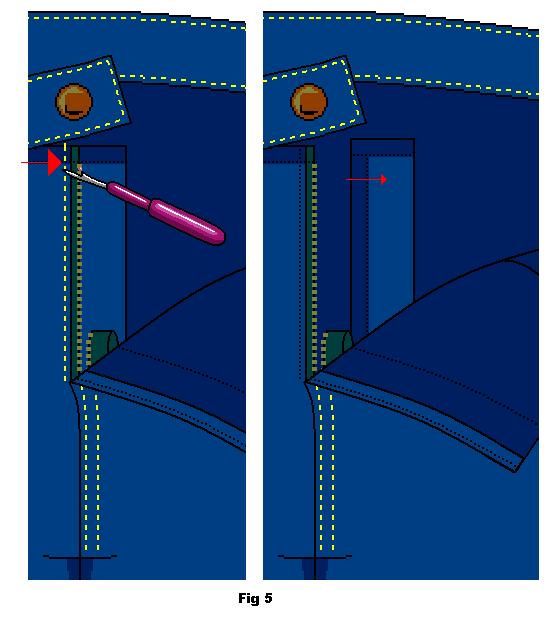
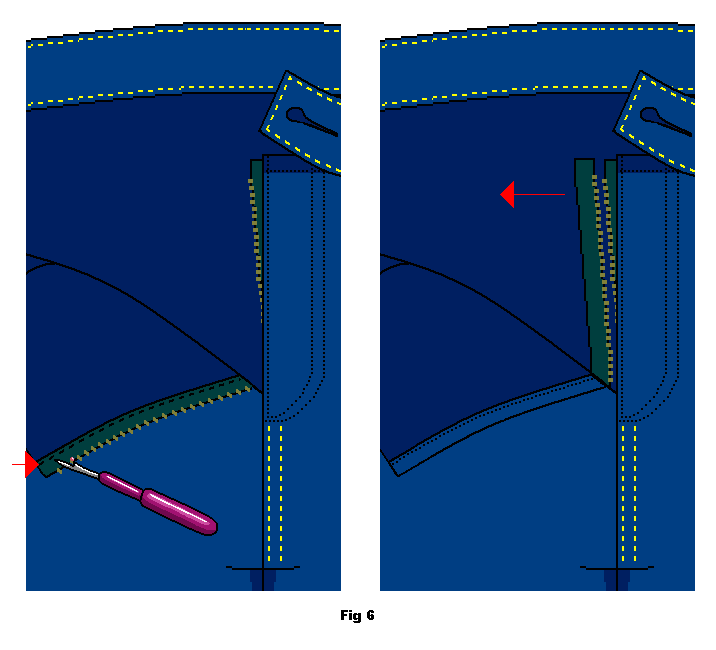
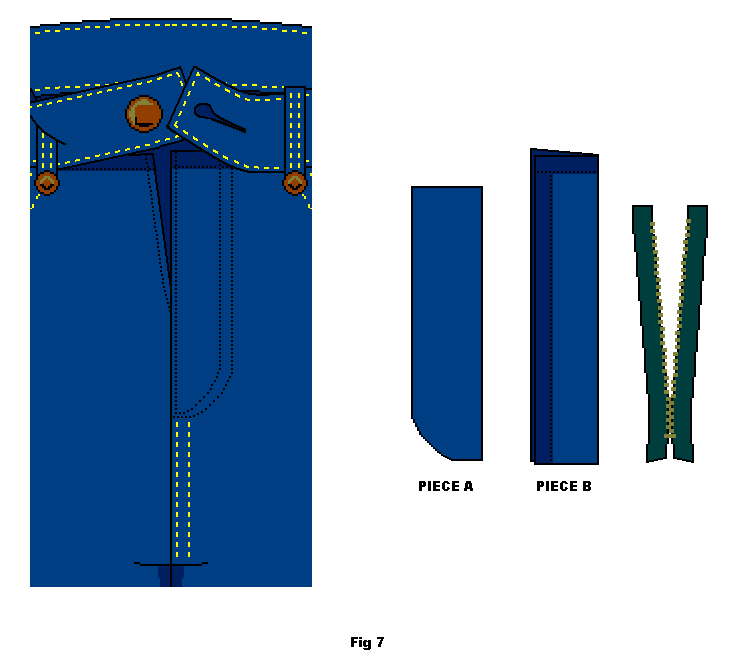
Remove the zip and the facing and set aside. The jeans/pants should be totally clear of the zip and all the facings now (fig. 7).
Opening seam to crotch
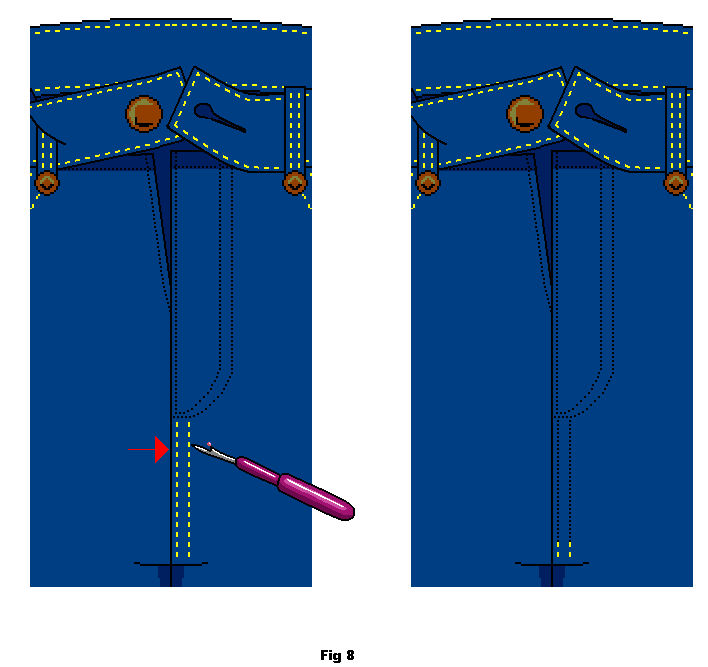
Pull out the stitching of the crotch seam from fly opening to a few cm above the crotch join (or shorter, depending on the zip length you wish you use.) Try to pull the top stitching rather then cut it. That way you have a longer length that you can use to secure the seam with a knot on the inside of jeans/pants (fig. 8).
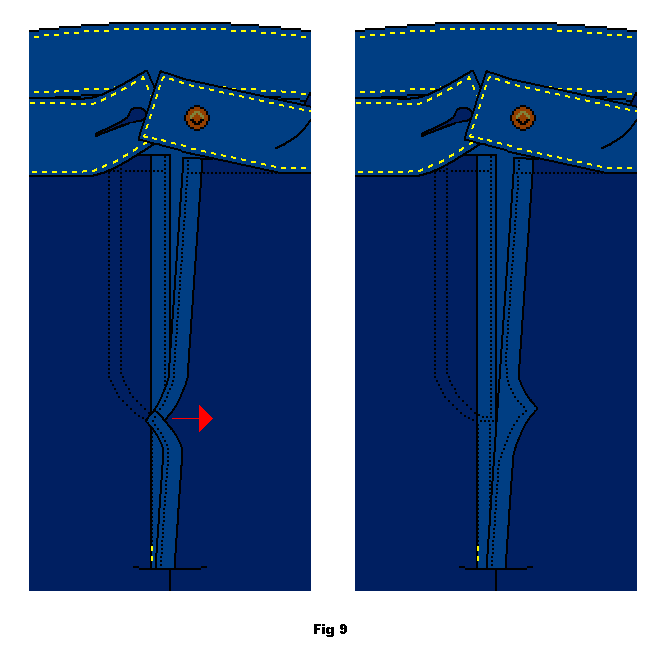
Because of the shaping in the crotch area, the un-picked area will not be totally straight. Use an iron to press the seam allowance on the fly sides to as straight as possible (fig. 9).
Make new facing.
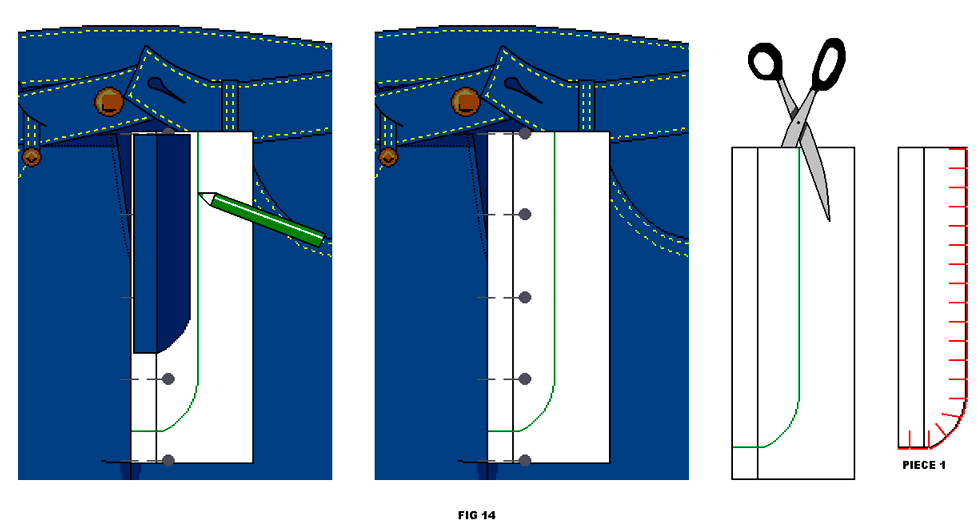
Measure the length of the new fly (usually to the crotch). Err on the side of slightly longer rather than not long enough (fig. 10). 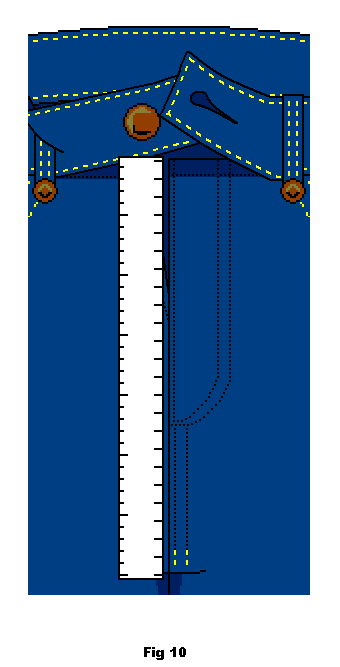
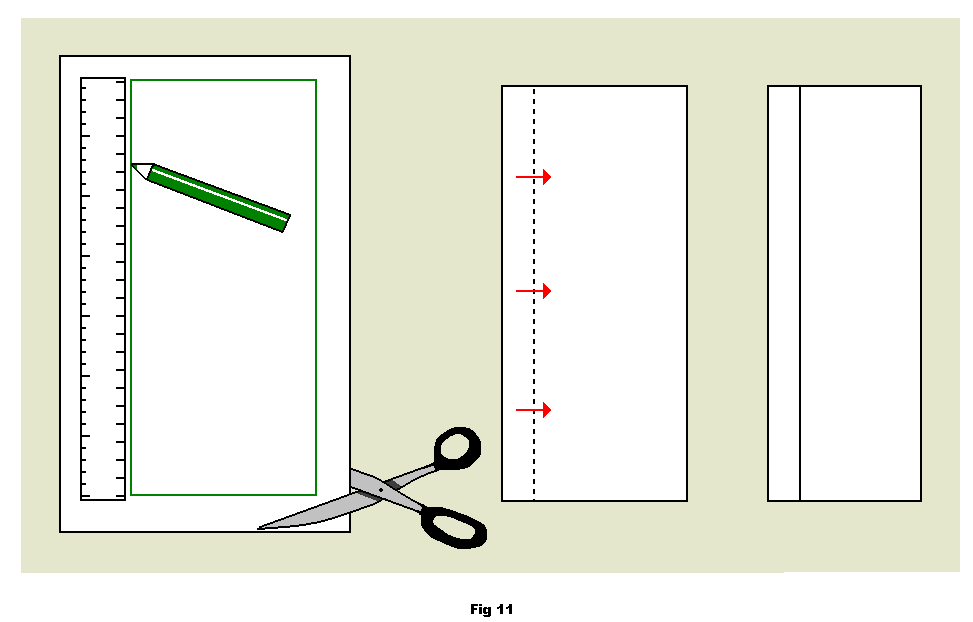
Cut a piece of scrap fabric to the right length (according to the measurement above) and approximately (slightly larger) width of the removed “facing piece A”. Fold and press a 1 cm seam on the long edge (fig. 11).
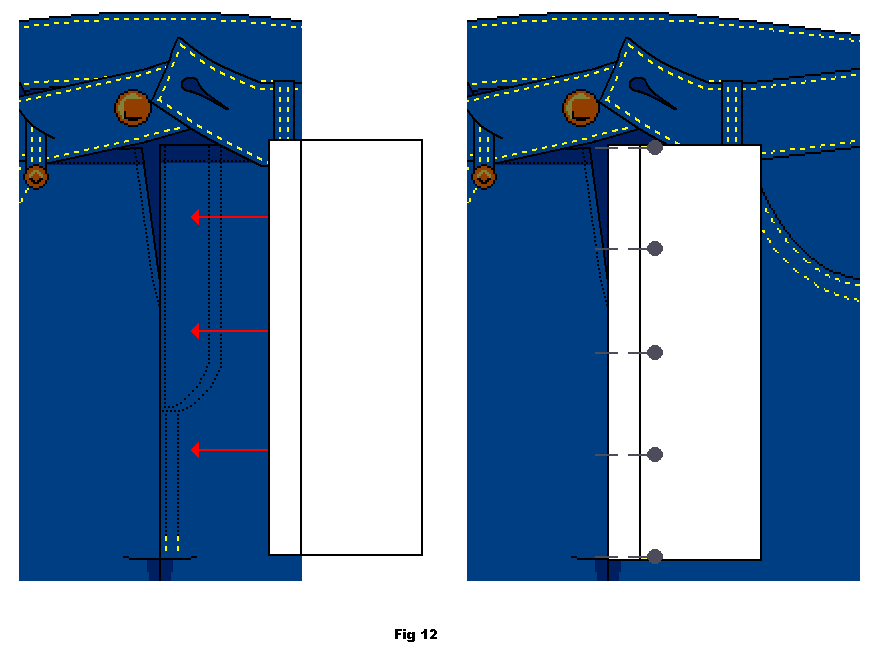
Pin the cut fabric piece to the jeans RIGHT side front with the folded fabric against the oppening (fig. 12).
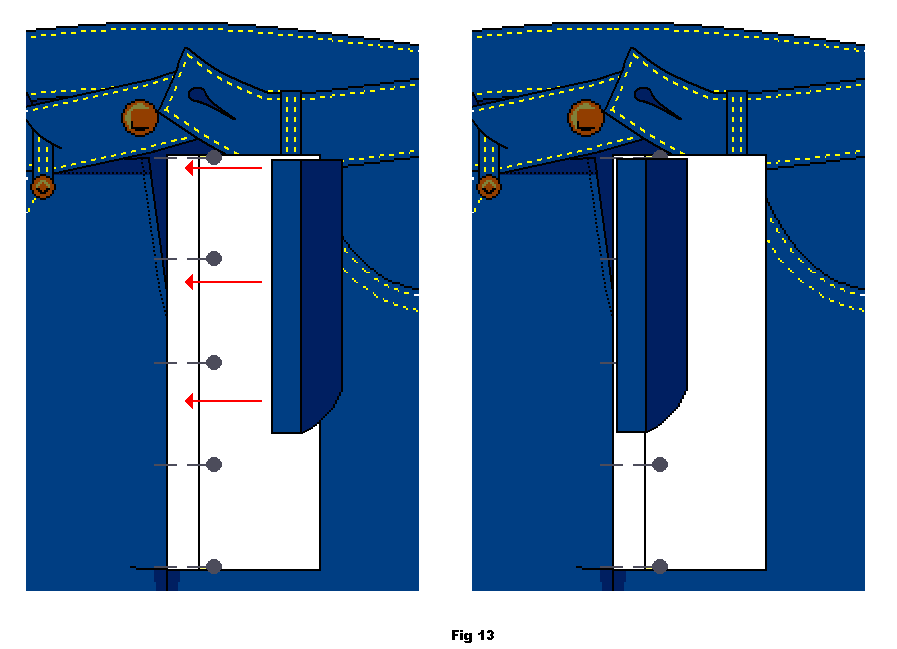
Using the old facing as a rough guide for the shape of the new piece of facing (fig. 13).
Mark shape of new facing piece and cut out. This piece will be your pattern piece. Use this pattern piece and cut out the piece in your real fabric. This is piece 1. Overlock or zig-zag the outer (curved) edge (fig. 13).
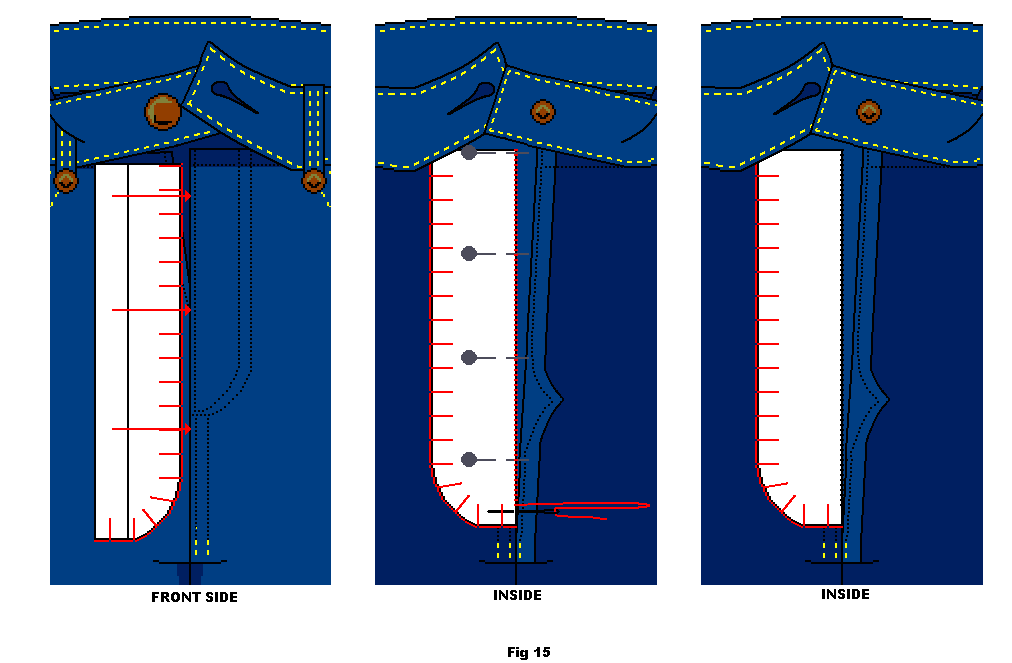
Pin piece 1 to the inside of the jeans, wrong sides facing in, right sides facing out. Using small stitches, sew piece A to the jeans along the edge (fig. 15).
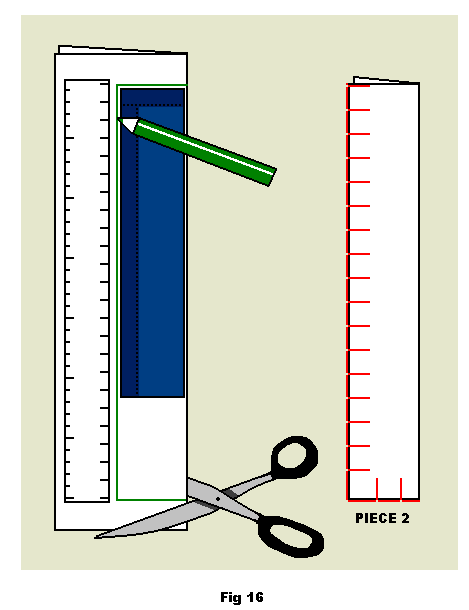
Take a strip of fabric. It is fine to use the fabric you are already using for the adaptation, no scrap is necessary. Cut a strip double the width of the facing piece B, and 1 cm longer than the zip that you intend to use.Fold the piece in half an press. Overlock or zig-zag the raw edges on the unfolded side and the bottom, don’t bother with the top.
Inserting he long zip.
Pin the zip to the LEFT side of the jeans/pants. Pin piece 2 with the folded side on the outside to the left side of the jeans underneath the zip (fig. 17). 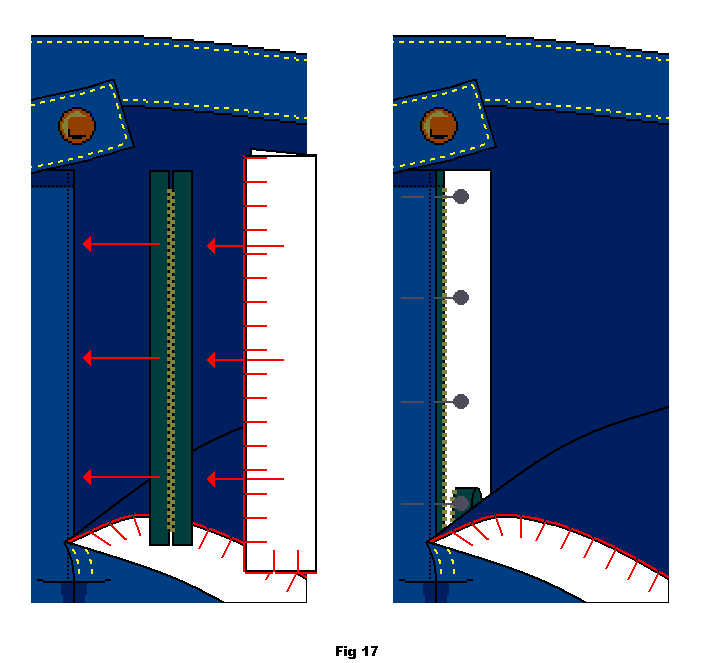
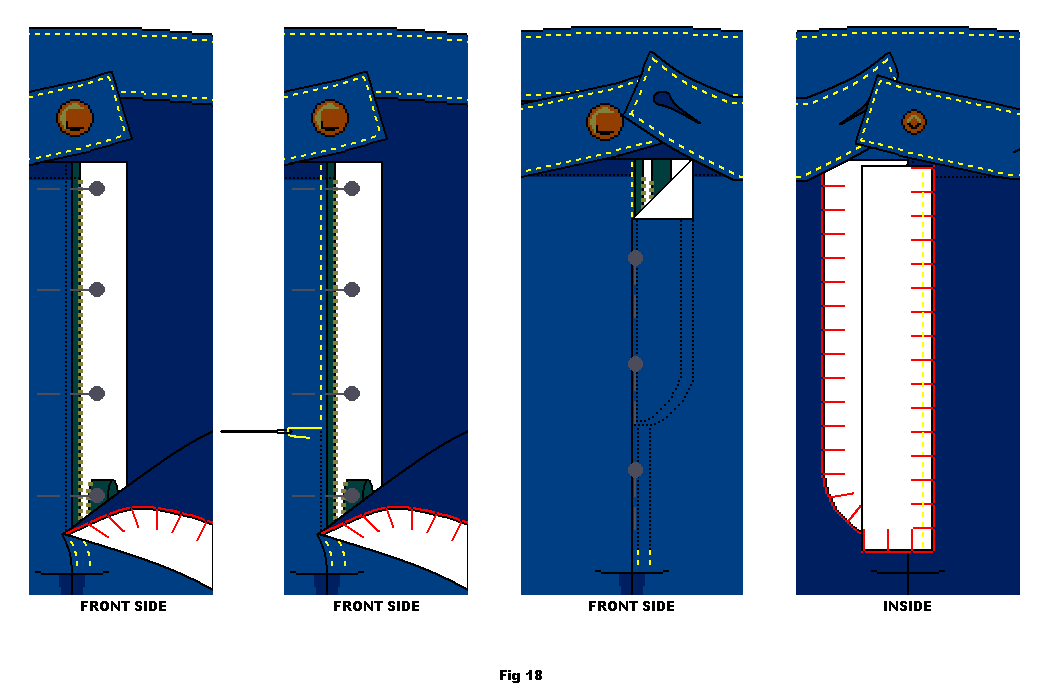
Hand stitch (big but secure stitches in contrasting thread) the zip and the facing (piece 2) to the left side of the jeans/pants or machine sew using a zipper foot, as in left two illustrations below (fig. 18).
Close the zip and lay the jeans in their natural position and pin the fly shut as in the right two illustrations below (fig. 18).
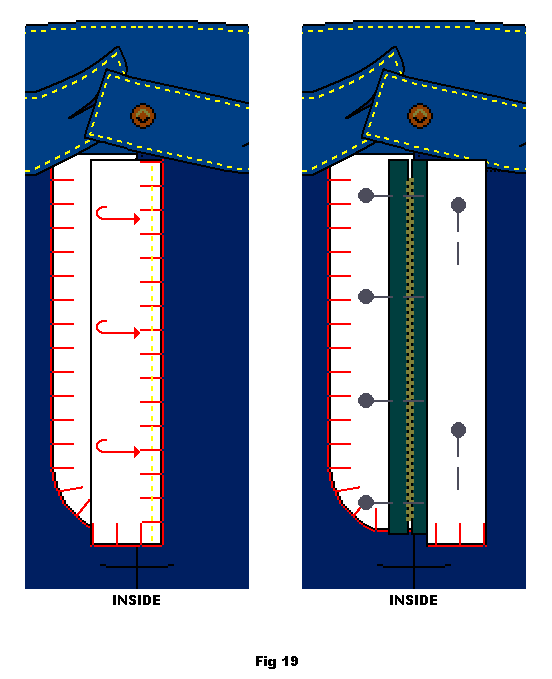
Turn the jeans inside out. Pin back piece 2 so that it is out of the way. Take care so the zip is not pulled out of alignment. Then pin the zip on to piece 1. Make sure you pin it only onto piece 1 and not through to the jeans fabric (fig. 19).
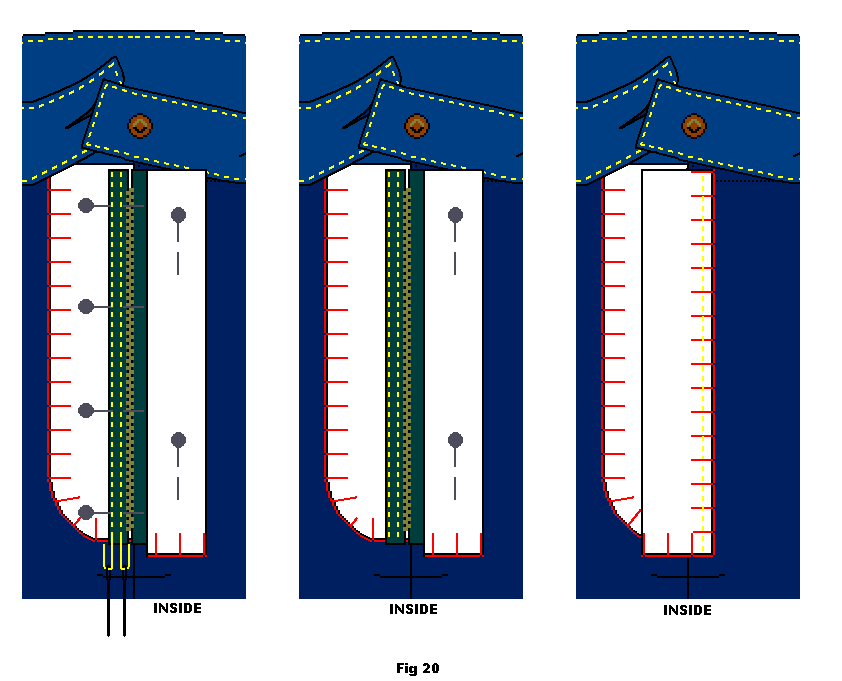
Hand sew the zip into place using small secure stitches. Sew 2 rows of stitching, one on the outer edge of the zip, and one about ½ cm from the zipper teeth. Do not sew too close or the zip will be not function.
Remember sew the zip onto piece 1 only, not through to the jeans fabric. Once done, unpin piece 2 (fig. 20).
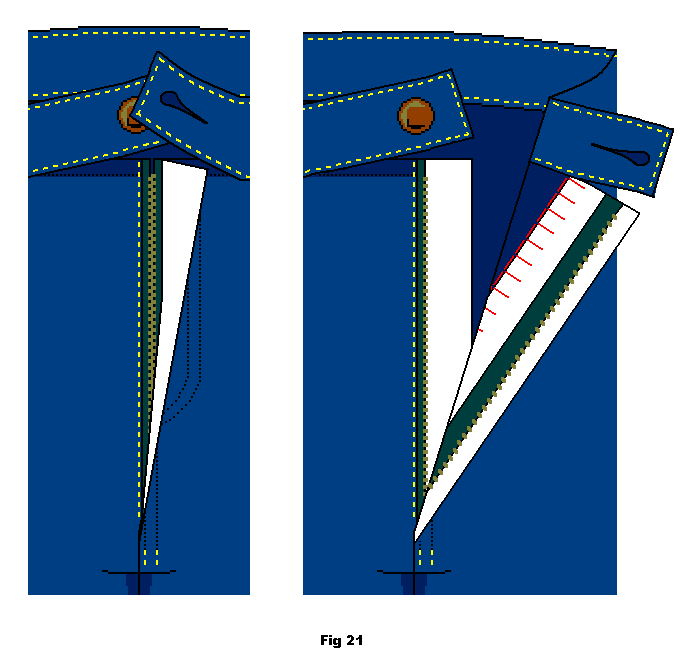
The zip is now in correct position (fig. 21).
Top stitching and waistband.
Match a thread to the top stitching thread colour. Thicker jeans type threads are available in many different shades from fabric and craft stores. Using the markings from the existing top stitching that was un picked earlier, hand sew the decorative top stitching, making sure you go through both the top layer of denim and the under layer of the facing (fig. 22).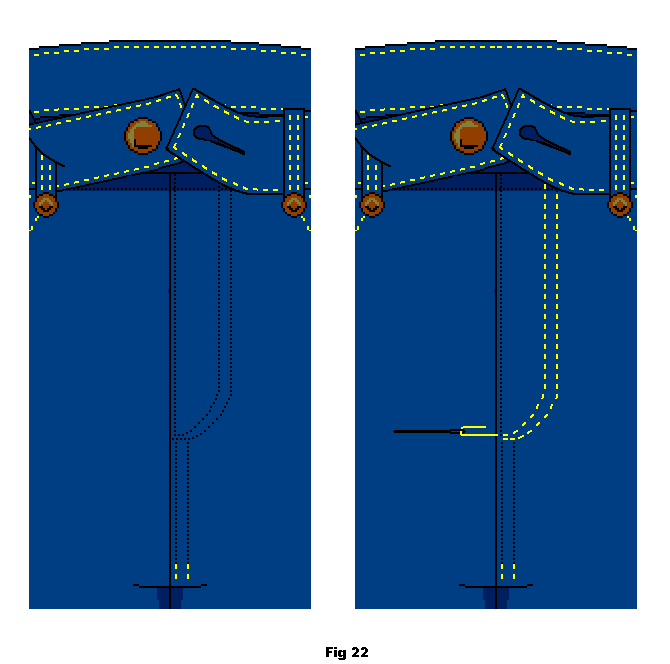
NOTE!
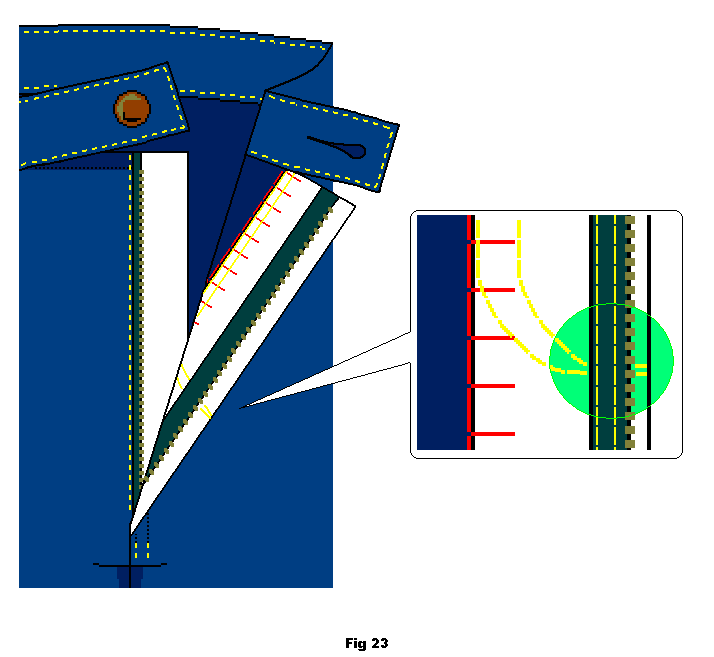
When you come to the zip stitch under it. Avoid stitching over the teeth of the zip as the thread will make the zip non-functional if it goes over it (fig. 23).
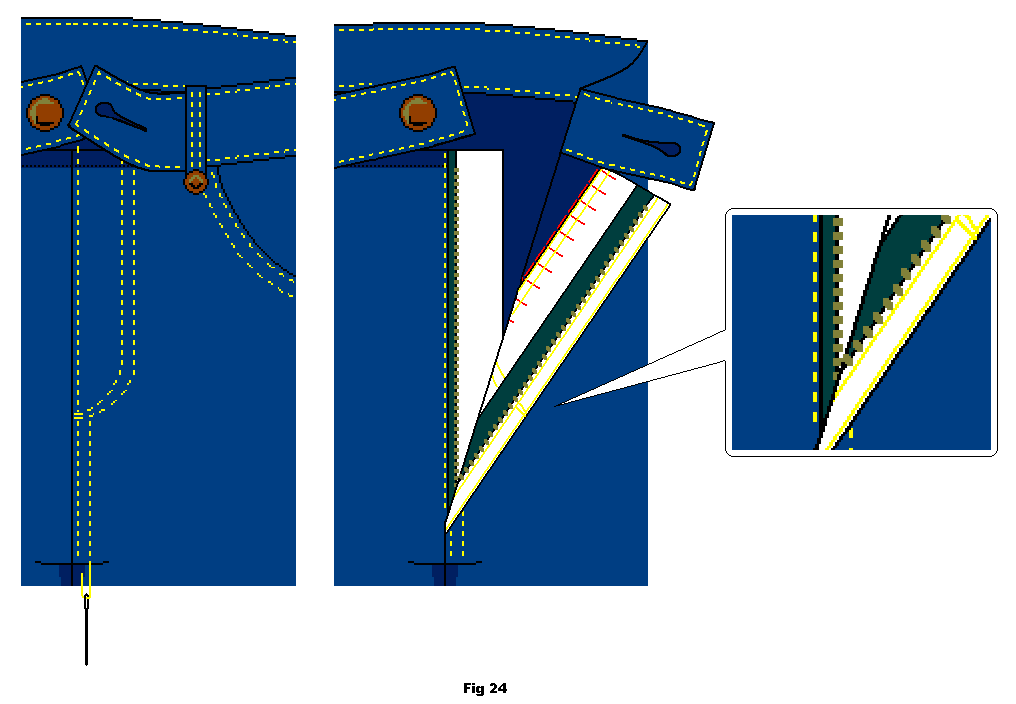
Continue all the decorative stitching like this taking care to avoid the zip when stitching close to it or over it (fig. 24).
Put in a few reinforcing stitches on the front side where the zip ends just beforee the crotch line. Use a thread that matches the denim and close the gap below the reinforced stitches with small stitches (fig. 25).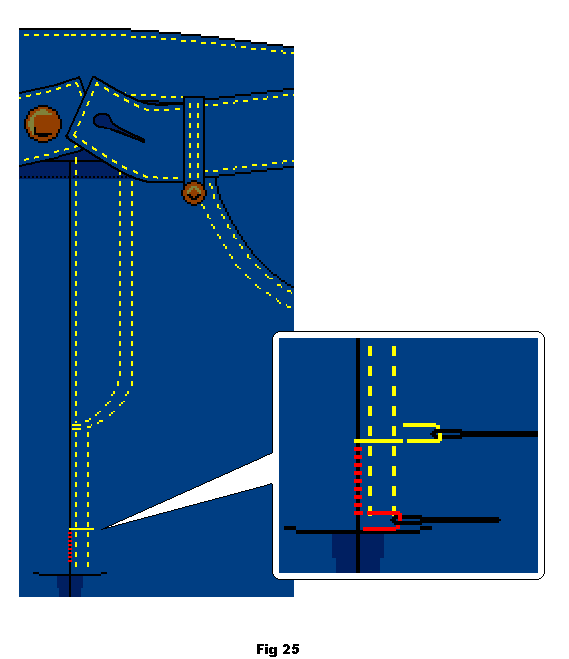
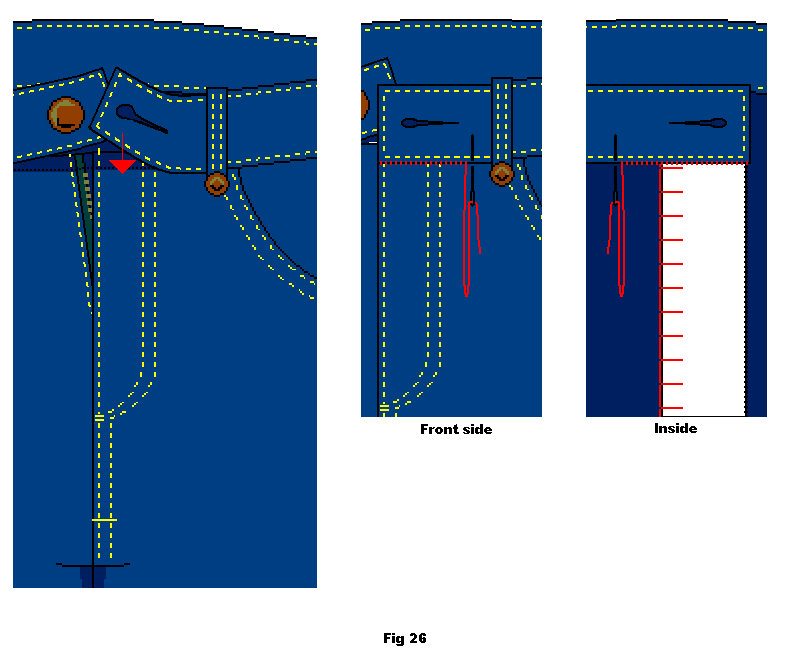
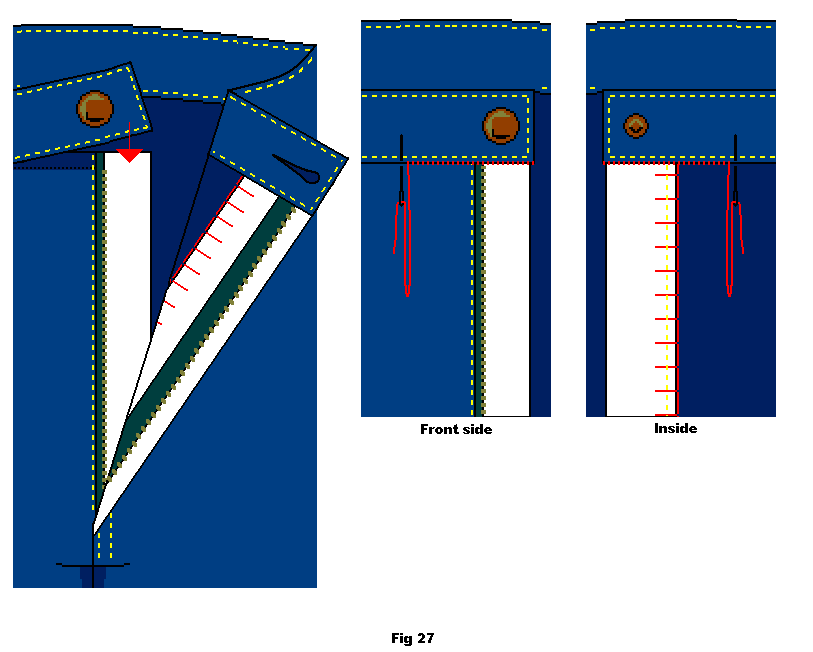
Adjust the waistband back in place carefully tucking in all the zip and facing edges. Hand sew the waistband into place on both front and back, on both sides (fig. 26 and 27).
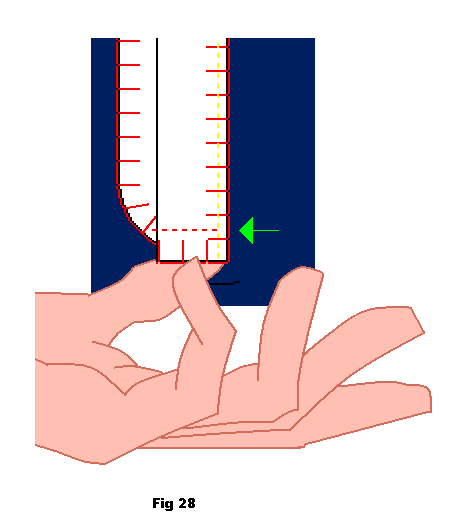
Finish the inside by stitching pieces 1 and 2 together at the bottom edge. Do not stitch them to the jeans (fig. 28).
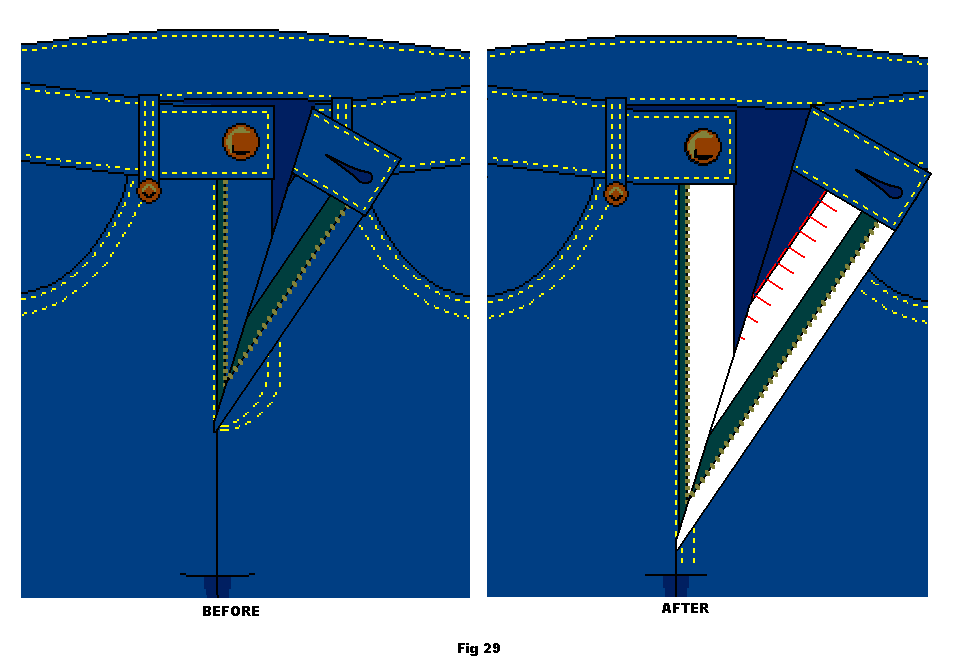
This is how the lenghtened fly looks finished with the ordinary fly stitching left but zip continuing below this to the crotch (fig. 29).



I have been searching for instructions and patterns for a very long time. I’ve done many searches but I never came across your site until I searched under men’s pants sewing patterns. This is just wonderful to find. I have to ask if you have instructions for reducing the amount of material in the front for men’s pants. I plan to lengthen the fly area and either make the zipper shorter or use snaps.
This is an experiment for me but I certainly would like to know if you have experience in doing this.
Thank you for putting these instructions and patterns on the web.
Have you checked the adaptation part of the site?
We haven’t shortened the front but we have lengthened the back of pants (and curved them slightly) which would generate the same effect. The only difference is that you would have to buy more low cut pants than normal. I tend to buy almost hipsters since they will fit like normal pants when adapted on me.
There’s also a solution on how to lengthen the fly which you could use while lowering the front of the pants. I don’t think it would be impossible to lower the front. You will have to unpick the waistband and re-sew it lower down. Cut out will be crescent shaped (to fit back to the side seams height) so you’´ll have to lengthen the waistband.
The adaptation for pants/jeans is found here
http://en.fashionfreaks.se/adapting-ready-made-clothes/pants-adaptations/
Susanne
Thanks for the article. I don’t know why all mens slacks/jeans aren’t designed/manufactured with the extended fly. It makes so much sense.